Celebrate Fall with Felt Leaves

Fall is my favorite season – the crisp temperatures, beautiful colors, warming foods like hearty stews and ginger cookies. And, a reminder to spend as much time outside as possible before winter arrives with its plunging temperatures!
To extend the fall season in your home and capture the beauty of the season, whip up some felt leaves that make use of leftover scraps from past projects. They look great placed under a table centerpiece – think ceramic pumpkins, a glass candle holder, or a vase of branches gathered on a walk. Other ideas:
- Add a magnet to the back of the stitched leaves and stick on your refrigerator – then rearrange often!
- Stitch the leaves to a ribbon using a small tacking stitch and string up on the fireplace mantle or a bookshelf.
- Cut a rectangle from burlap or heavy canvas, arrange the leaves in a random pattern, and stitch in place using a tacking stitch in several places on each leaf. Then, hang on the front door or someplace in the house where you can enjoy.
Here’s the how to:
Step 1: Collect felt scraps in fall colors – oranges, reds, browns, yellows greens. Then, get ready to play with the color, shape, thread color and stitching.
Step 2: Sketch out an assortment of leaf patterns based on trees that are real or imagined. Or, download leaf coloring pages from the Internet and use these as your patterns.
Step 3: For each leaf, cut out two sizes. The larger one should be about 1/4″ bigger all around than the smaller one. Enjoy the process of playing with the colors – make some leaves that high contrast, others with less – to see what you like best. Creating a mix of leaf combinations will help keep it interesting (IMO).
Step 4: Place the smaller leaf on top of the larger one in each leaf pair and pin in place to hold while you are stitching.
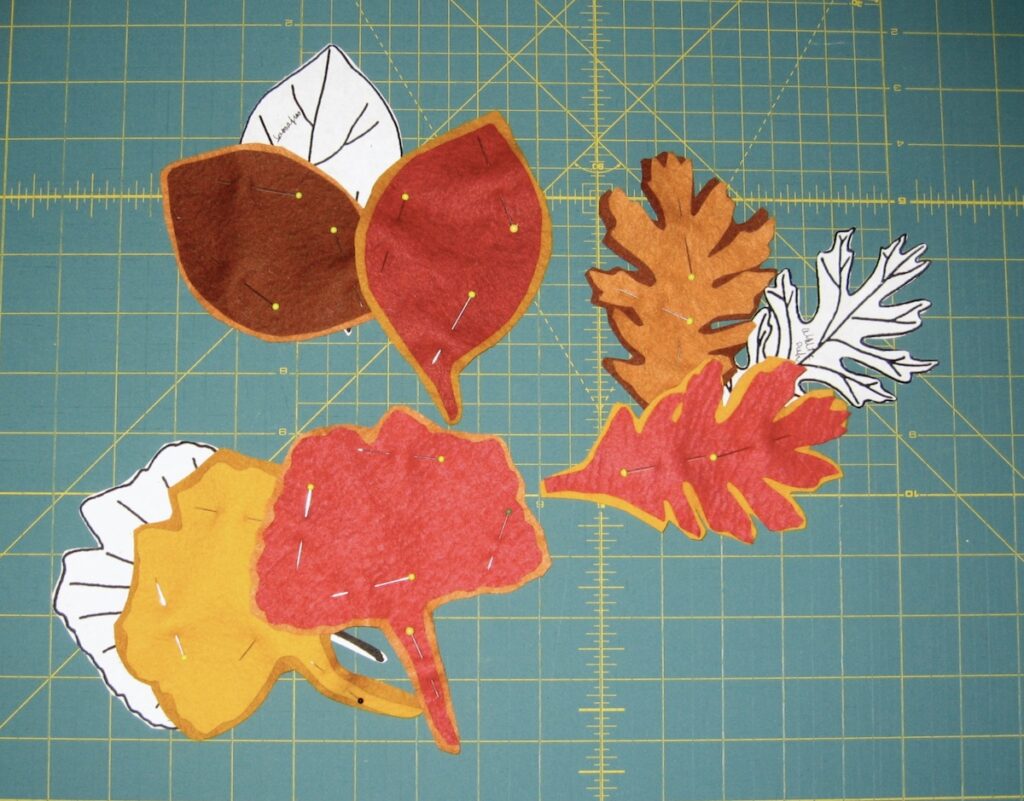
Step 5: Stitch the two leaves together to emphasize the overall shape and vein pattern. You have many options here for stitching: hand stitching using different embroidery stitches or a simple running stitch; machine stitching that takes advantage of your machine’s capabilities or a simple straight stitch (as I did here). If you are hand stitching the leaves together, you can use embroidery floss, perle cotton, or heavy sewing thread. NOTE: You can use a pencil to lightly mark your stitching pattern on the felt so that you can cover it with your stitches. Alternatively, use the edge and curve of the leaf to inform the placement of your stitches.
Step 6: Have fun, use and enjoy!
Sharing the making experience with others:
Here are some ideas for adapting the project if you are short on time or materials, have a little one who wants to participate in the leaf-making fun…
- Glue the leaves together, then “make stitches” with a Sharpie.
- Use a big needle and big stitches to hand sew the leaves together.
- Divide the steps up to match each person’s age, skill level and/or interest.
- Use heavy card stock or construction paper instead of felt. Then, using markers, draw the stitching pattern on the leaves.