Bits and Bobs: The Makings of a Most Excellent Creativity Lab

A collection of found craft objects

When I was young, one town we lived in hosted a pumpkin festival each year at Halloween time. Kids would select a category – like science fiction, famous people, or books – then, decorate their pumpkin accordingly. All the pumpkins were displayed on the courthouse lawn for a week or so with different events throughout, including a parade and an awards ceremony where 1st, 2nd, and 3rd place ribbons were awarded in each category.

One year when I decided to create a pumpkin martian, a neighbor invited me to come by if I needed any supplies. Entering her family room, I was not sure this trip would yield anything of use – until she opened the closet door. This was not an ordinary closet!

There was a desk with drawing paper, pencils and some small hand tools. On the back wall, above the desk, were several shelves with paint (including a martian-perfect metallic green) and glass jars full of odds and ends – bits and bobs. Toothpaste caps, miniature glass Christmas tree bulbs, googly eyes in many sizes, pipe cleaners, beads, empty thread spools…

With no older brother or cat to get in my way, this space became my creative lab for the next week as I worked on my pumpkin each afternoon after school. While quite pleased when the pumpkin won a ribbon, it did not compare to the joy I felt when I was deep in the process of designing and creating the martian.

When my own kids were growing up, we filled several shoeboxes with an array of objects that might be useful for art and science projects – sewing machine parts, spools, pieces of leather from an old belt… The shoeboxes were in a closet – handy enough for them to pull out and sort through.

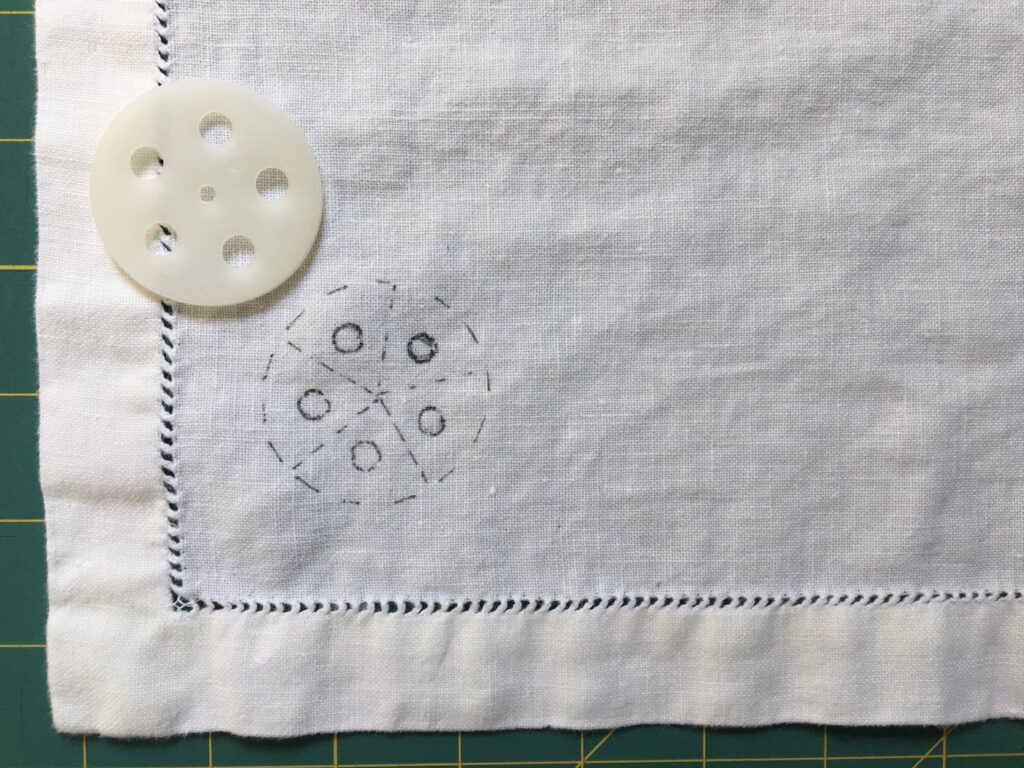
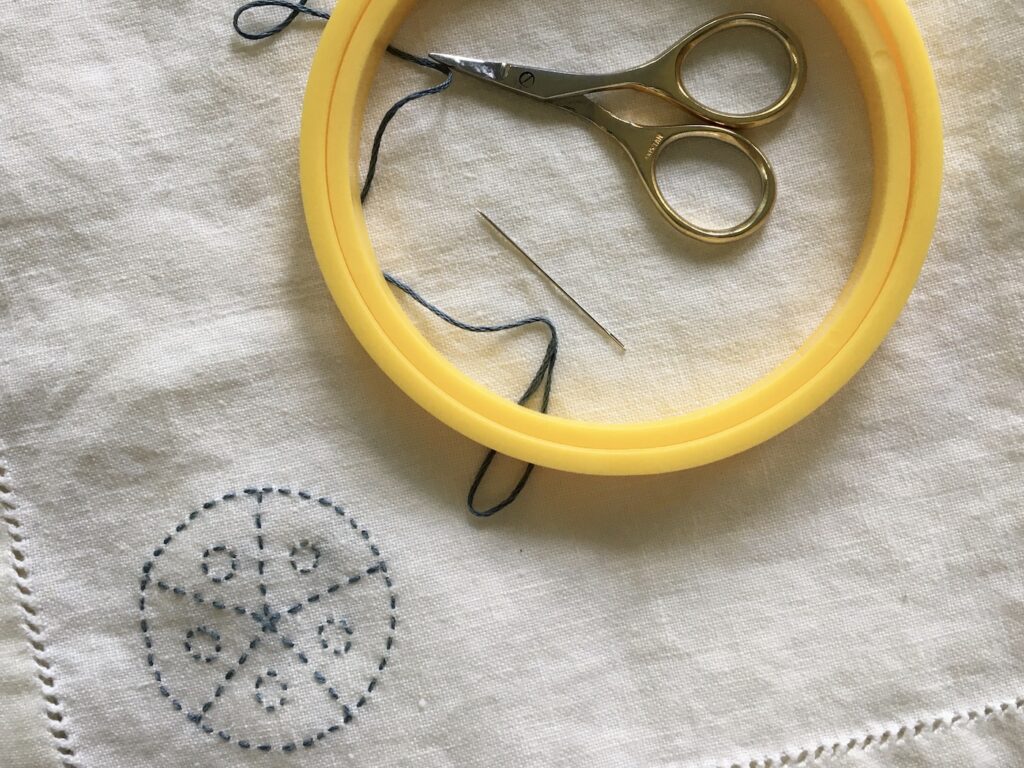
In my sewing studio, I have a random collection of objects that I often turn to when looking for inspiration. Case in point – this spice jar shaker thing that became the basis for the motif stitched on a linen napkin:

Circle embroidery pattern drawn on white linen napkin

Circle Embroidery Pattern Stitched in Blue Thread on White Linen Napkin and hoop, thread, scissors, and needle

So, where to start? Collect and organize the random objects currently stashed in the kitchen junk drawer, in a desk, etc. Next, set up your own creativity lab on a closet shelf or in the corner of a room. Then, of course, play! Here are some ideas:

  • Make a mobile.
  • Make a small sculpture for the middle of the dinner table. You could even change it out several times a week, taking turns with other family members.
  • Sketch an object or two, playing with color and layout.
  • Use the object as a starting point for an embroidery project as I did above.

Happy Making!

Exercising Your Creativity Muscle

Basket with Vegetable Garden Plant Markers to Decorate

Creativity has been likened to a muscle: We all have it – we just have to work to strengthen it so that we can reap the rewards.

Over the last few months, with sheltering in place and social distancing the new normal, implementing a daily creative practice is as important as ever. Our world feels a bit smaller, our days a tad mixed up (“Is this Sunday or Monday?”), and our work-life boundaries totally blurred (think kids playing at your feet while you’re trying to get work done, office texts and emails still flowing in at 8 or 9pm, or extra long shifts at the hospital). Expressing ourselves through writing, drawing, painting, sewing, quilting… can help provide a much-needed, nourishing break from the challenges we are facing in our lives right now.

And, if setting aside time to make and create sounds a bit indulgent these days, it’s not. The spillover effect I mention here – Step #6 on the Art Everyday page – is well documented. For example, this Fast Company article from a few years back talks about that spark we feel or breakthrough we have after engaging in a creative practice.

Decide on the best time to fit a creative break into your day, experimenting to see when you get the most benefit: Do you want to use the practice as a warm-up exercise for the day, a mid-day boost, or a transition from your workday to home life. It does not have to be a big chunk of time – committing to 15 minutes a day can make a big difference.

I’ve always got several projects going on in my studio at any given time. However, I keep a basket for just one simple, self-contained project. It sits in my office, ready to go when I need a creative break (usually at the end of the day). The projects rotate: Right now, I’ve stashed a vegetable marker kit from Target. The original kit had paints, which now look dried up, but we’ll see when I get to work. I might instead fill the space up with different patterns using Sharpies instead. It might take me all week to finish the project but the point is that it’s easy to start and stop and all my supplies are in one place, making it hard not to begin. Once this project is finished, I’ll find something else to put in the basket.

My recommendation is that as you develop a creative habit, keep it simple and start with what you enjoy – at least at the beginning. First find a container, something that works for the space you are working in and is portable – a basket or tote bag works best. Then, if you like to write, add a journal or notebook and your favorite pen or pencil to the basket. If you want to spend time each day working with watercolors, stash a small water color set, brush, and a 6″ x 6″ pad of watercolor paper in the basket…

If you have kids, consider making a basket up for each of them that is age appropriate and, ideally, something they can do by themselves at a time when they most need it. For example, a potholder kit, paper and instructions for making paper airplanes (include different kinds of paper to see what flies best!), or a coloring book and crayons.

I’ve long said that when I have a problem to be solved, the best way to figure it out, is to spend time in my studio making. Getting lost in the flow of making frees up headspace to think more creatively, beyond the box – first, in what I am actually doing in the studio and then for the problem/issue I’m trying to resolve.

In the coming weeks, months, and years, creativity will be key to generating new ideas for rebuilding our lives, our communities, our healthcare systems and, well, pretty much everything. And, throughout this process of creating new, focusing on lessons learned from the past, listening to experts, and cultivating out-of-the box thinking so that the end result benefits everyone and addresses what hasn’t worked in the past. Like many things, we can start at home – thinking more creatively about how we solve problems there and at work, then build from there.

So start flexing your creative muscle by building a daily creative practice, stick to it, and enjoy the process and spillover effect! Read more about building a creative habit here. Connect with us on Facebook to see some additional ideas in the coming days of what to put in your basket.

Make in a Day Pillowcase

Yvonne Malone Studio Make in a Day Pillowcase folded on top of quilt

Some days you need a quick project – one that can be made in a day or, better yet, a couple of hours. After spending half a day working on several frustrating technology issues (are there any other kind?), I decided to take a break and finish up this project and pattern…

Besides the almost instant gratification that making pillowcases provides, I also love that this is a great project no matter your skill level. New to sewing? Make up the pillowcase following the step-by-step directions here. Experienced sewist? Set aside your machine and make the entire project by hand. Or, use a solid color for the fabric next to the opening, and add an embroidered message like “Pleasant Dreams”.

So decide who you are making the pillowcase(s) for – you, a niece or nephew moving into their first big kid bed, a wedding shower gift… Then, open up the pattern here and happy sewing!

Be safe. Be well.

Cropped photo of Yvonne Malone Studio's Make in a Day Pillowcase

Wear in Good Health Face Mask

Completed Face Mask, Keys and Sunglasses on Table

Over the last few weeks, like many others, I’ve been busy sewing face masks. I’ve also spent a lot of time looking at and sewing different designs, then playing with the design to make the most of fabric yardage, streamline the construction, allow for a filter to be inserted, and produce a mask that fits comfortably and snug over the nose and mouth. The end result is the DIY Wear in Good Health Face Mask.

As I made these masks for friends, family and others in the community, the phrase “Wear in Good Health” kept coming to mind. It is a separate tag sewn into several vintage sweaters and other clothing items I’ve owned over the years, and it has always given me pause when slipping into those garments. In our 21st century world, it seemed like a good name for a mask pattern.

As the essentials we grab before running out the door expands from keys, wallet, glasses to also include a mask, if you don’t have one already, check out the free Wear in Good Health pattern here.

And, just a note: The science behind what materials make the best DIY masks, the best filters is evolving as scientists learn more about the virus and the effectiveness of these materials. Before making any mask, check with Centers for Disease Control website page for DIY mask coverings for the latest developments and guidelines.

Take care and be well ~

Picking Up, Cleaning Up, Finishing Up

Pink knitted scarf with beads laying on sewing basket

Picking Up, Cleaning Up, Finishing Up. This has been my motto since the shelter-in-place went into effect for Illinois residents last month. I especially like the “finishing up” part – it feels really good to complete projects and send them on their way to be used in our home or to be given as gifts to others. These two scarves, discovered at the bottom of my mom’s old sewing basket, in particular though, tugged at my heart. It seems like yesterday when I was teaching my then young daughter how to knit. She got about 10″ in on the pink scarf before declaring that she didn’t really like knitting. At all.

So, flash forward about 10 years and I finished the pink scarf in the last couple of weeks. And, because of the “cleaning up” part of my routine, I decided to add the pony beads discovered in the back of the craft closet to the other end. I emailed a picture of the scarf to my daughter who said I could keep it because pink just isn’t her color. That is the answer I was hoping for… I love this scarf and all its imperfections as she learned a new craft and we both experimented with expressing ourselves creatively.

Knitted pink scarf with brightly-colored plastic beads

She gave knitting one more try a couple of years later when our neighbor who can knit anything worked with her on the purple scarf. I finished it up and it will soon go off to my daughter because purple is her color : )

Pink knitted scarf and purple knitted scarf and knitting needles

Like many new endeavors – knitting or otherwise – start small and grow from there. As you practice, your skills will improve. I love to knit but still consider myself a beginner. I stick mainly to scarves because the scale makes them doable, portable, and easy to experiment with using different stitches and threads.

If you’re new to knitting, check out the offerings of your local yarn store. There are lots of great stitch tutorials and patterns on sites like PurlSoho, Quince & Co, and Studio Knit. There are also plenty of organizations doing good work that seek knitted donations – often simple projects like baby hats (check with a local hospital) and wildlife rescue nests for baby birds (again, check with local organizations).

And, remember to have fun, especially if you are teaching a child to knit. If you want to add pony beads to your knitting project, here’s a great tutorial. While I am a big fan of using beautiful, good quality materials for projects, I also enjoy experimenting with what I have on hand, especially non-traditional materials. For example, try knitting using white kitchen string, twine, even red and white bakers string. BTW, I think this would make a great rug or curtain in a doll house.

Swatch knitted with red and white bakers string

Have fun creating ~ stay well!

Go-To Hot Pad

Hand Quilted Hot Pad Made Denim

The hand-quilted Go-To Hot Pad plays a supporting role in the kitchen but a big role in your daily routine – holding a hot bowl of oatmeal in the am or a steaming one-bowl meal in the pm. It goes hand-in-hand with your favorite bowl and favorite mug… A bit of art and a reminder to hit the “off” switch while you enjoy a meal.

Here’s the backstory on this project…

In college I bought a wok – the kind with a ring that sits on the burner and the wok sits down in in. Tucked in the box was a great recipe book that we still use and a blue and white hot pad with a cow in front of a fence printed on it along with the words “La Vache,” French for cow. The wok is now blackened from years of use and the hot pad is tattered, stained, and will likely not withstand another spin in the washer. The hot pad is still everyone’s go-to for holding a hot bowl of anything. Thus, this project was born – we need a replacement! Read on for the directions on making your own hot pad by hand or machine…

Two Hot Pads Made from Denim Jeans and Scraps of Plaid Fabric

A few notes about the project:

  • The beauty of this project is that you can probably find fabrics in your existing stash or clothing in the giveaway pile. If you need to buy new, check with your local fabric store.
  • You are making a hot pad to hold a bowl you are eating from or to scoot under a hot dish or mug of coffee. You are not making a potholder to grab a hot dish from the oven.
  • A quilt is comprised of three layers – often referred to as the “quilt sandwich”: the top layer (aka the quilt front), the middle layer (composed of quilt batting or flannel to give your quilt a bit of loft), and the backing (often just as interesting as the front because of the pattern your hand-quilting stitches make).
The 3 layers of a quilt

Step 1: Gather your supplies:

  • Sewing thread and needle if hand sewing; machine and thread if using
  • Pearl cotton and needle with eye large enough to accommodate the pearl cotton for hand quilting. I used dark blue on the one hot pad (DMC #823, No. 8) and off white on the other (DMC Ecru, No. 12). A side note about pearl cotton: The higher the number, the finer the thread.
  • Scissors
  • Iron and ironing board
  • Chop stick
  • Thimble
  • Needle threader (optional) to make it easier to thread needle
  • Fabric scraps – For the top layer in the sample, I used old jeans (100% cotton only) to lend a worn-in look and feel right from the start along with scraps of plaid fabrics. For the middle layer, I used flannel; a scrap of quilt batting would also work. For the backing, I used a piece of 100% cotton duck, something to complement the rugged feel of the front. Read more about the amount you will need in Step 2.

Step 2: Calculate how much fabric you need:

  • First, do a bit of research – what size works best for your favorite bowl? Cut up paper towels and tape together, if nec, to determine the right finished size for your purposes, or stick with the dimensions used in the samples per the table and image below.
  • If you’re calculating your own dimensions, allow 1/4″ seam allowances all the way around.
Hot Pad Sections that Correspond to Cutting Instructions Table
Table of with Cutting Dimensions for Each Fabric Pieces in Hot Pad

Step 3: Cut out the pieces. If you are repurposing clothing, trim away seams.

Trimming away seams on old jeans being used in project

Step 4: Baste the middle layer (flannel or quilt batting) to the WRONG side of the fabric being used for the back. If basting by hand, use a running stitch – see the Soap Bubbles Dish Towel project for the how-to on this stitch.

Flannel and Backing Layers of Hot Pad

Step 5: Pin then stitch the quilt front to the quilt back-middle layer with right sides together and using a 1/4″ seam. If you are stitching by hand, use a backstitch. (NOTE: the right side of the top should be facing the right side of backing.) Leave a 3″ opening for turning right side out.

Quilt front and Quilt Back ready to be stitched together

Step 6: Clip the corners to reduce bulk, then turn right-side out using a chop stick to poke corners out. Press flat.

Clipping corners on sewn hot pad

Step 7: Pin, then stitch the opening closed using a hidden (aka invisible) stitch.

Hot Pad Ready to be Quilted

Step 8: Quilt using a design of your choice.

  • If you are quilting near the seam lines, you can just eyeball the line without marking – just remember to stitch far enough out so that you are not going through multiple layers of fabric – perfectly doable, just hard on the fingers!
  • If you want to mark a design on the surface (like the circular pattern in the sample), use an erasable or disappearing fabric marking pen available at most fabric stores, a Frixion thermo- reactive pen by Pilot, or white school chalk.
  • In the samples, I used a running stitch- like the basting stitch in Step 4 above, but smaller, consistent stitches – about 7 stitches per inch – with consistent spacing between. See the Soap Bubbles Dish Towel project for more about this stitch.
Hand Quilted Hot Pad Made Denim

Step 9: Use it! Here are some great looking recipes for one-bowl meals!

Post your finished Go-To Hot Pad on social media using the hashtags #ArtEveryday2020 and #togetherapart.

Stay up to date as new projects are posted by following us on Facebook!